在 Spring boot 上撰寫 API 與 Service 的單元測試 JUnit、Mockito
軟體在開發時期常會一直疊代更新,為了確保功能正常並保證出產品質,測試是不可少的,而單元測試也是其中最小單位也較好實作的,後端的單元測試最基本要確保 API 的正常運作與回覆,深入一點要確保每個 Service 的功能運作正常,今天這篇將針對這兩部分來做個紀錄
JUnit
Junit 是一個 Java 的單元測試框架,可以透過簡單的 @Annotation 宣告來撰寫 Unit test,配合 Assertions 來斷言測試結果
Spring boot 的 Unit test 主要運行在 JUnit 上,透過加入 spring-boot-starter-test 的依賴,來把初始的測試環境架設好
Mockito
Mockito 是用來輔助進行單元測試的 mock 框架,可以用來模擬 method 被呼叫後的行為,包含返回值以及異常拋出,讓我們可以專注在測試案例上,也方便建立單一的測試環境
撰寫測試
- IntelliJ IDEA 2021.3
- Spring boot 2.5.2 版,預設 JUnit5
- 加入依賴
<dependency>
    <groupId>org.springframework.boot</groupId>
    <artifactId>spring-boot-starter-test</artifactId>
    <scope>test</scope>
</dependency>
建立路徑 /src/test/java 以及 /src/test/resources,將撰寫的單元測試放在 /src/test/java,resources 下則放希望在測試環境下套用的資源檔
基本測試
import org.junit.jupiter.api.Assertions;
import org.junit.jupiter.api.Test;

public class DemoTest {
    @Test
    public void oneEqualOne() {
        Assertions.assertEquals(1, 1);
    }

    @Test
    public void oneEqualTwo() {
        Assertions.assertNotEquals(1, 2);
    }
}
寫完測試後輸入指令 mvn clean test,就會開始執行測試,看到下面訊息表示執行完畢,並且會列出統計數據
[INFO]
[INFO] Results:
[INFO]
[INFO] Tests run: 2, Failures: 0, Errors: 0, Skipped: 0
[INFO]
[INFO] ------------------------------------------------------------------------
[INFO] BUILD SUCCESS
[INFO] ------------------------------------------------------------------------
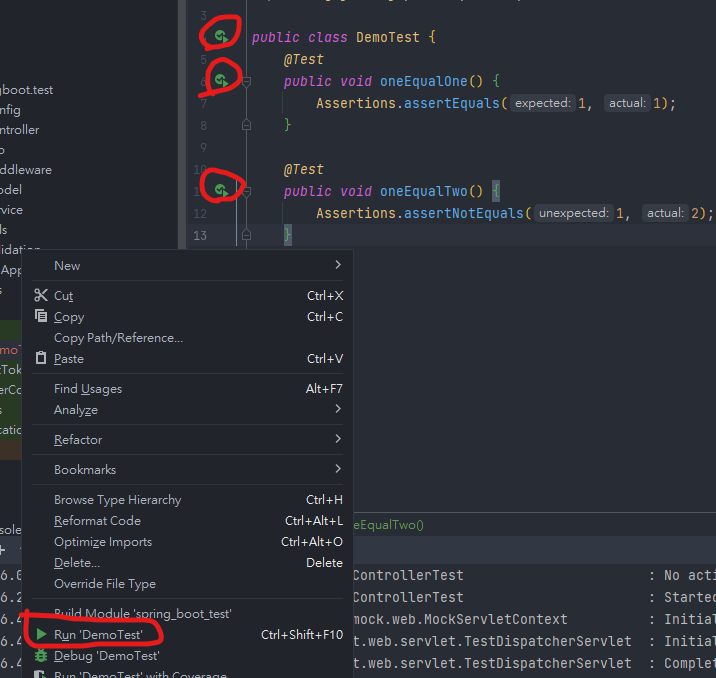
- 不過如果是用 IntelliJ 的話可以直接在下面位置執行:

- 這樣子會有比較詳細的執行結果,也會有階層式結構,結果一目瞭然:

Test Service
接下來要進入到 Spring boot 的測試階段,通常細部的功能都會被包裝在 Service 之中,所以就先從 Service 開始寫起吧。這邊的例子是一個用來產生以及驗證 JWT 的 Service:
@SpringBootTest(classes = JwtTokenService.class)
public class JwtTokenServiceTest {
    @Autowired
    private JwtTokenService jwtTokenService;

    @Test
    public void testInvalidJwt() {
        Assertions.assertThrows(AuthException.class, () -> {
            jwtTokenService.validateToken("test");
        });
    }

    @Test
    public void testWrongSignature() {
        Assertions.assertThrows(SignatureException.class, () -> {
            jwtTokenService.validateToken("eyJhbGciOiJIUzUxMiJ9.
            eyJleHAiOjE2MzkyMDQwMjYsInVzZXJuYW1lIjoib2FtLXJlcG9ydGVyIn0.
            Rx1rDcfZjxh55eemcvYMA1-E0Tt4V5PCH8LyZUsEaTNMIsHV
            O4CGQPh9WwHYk3xkcOJnMfyzOc0Mk6Kl9h3USg");
        });
    }

    @Test
    public void testExpiredToken() {
        Assertions.assertThrows(ExpiredJwtException.class, () -> {
            jwtTokenService.validateToken("eyJhbGciOiJIUzUxMiJ9.
            eyJleHAiOjEsInVzZXJuYW1lIjoib2FtLXJlcG9ydGVyIn0.
            _RJl8H4dOWpjYoOz1qyr_qnqSExFB0i7FqA8LAJwFSfvwhE4DS6
            YD7zXgpCqoZqROzaZryCJ2xF34ARMbPZtFw");
        });
    }

    @Test
    public void testGenerateAndValidToken() throws AuthException {
        JwtPayloadDto payloadDto = new JwtPayloadDto("test");
        TokenDto tokenDto = jwtTokenService.generateToken(payloadDto);
        Assertions.assertDoesNotThrow(() -> {
            jwtTokenService.validateToken(tokenDto.getToken());
        });
        Assertions.assertEquals(
            jwtTokenService.validateToken(tokenDto.getToken()).get("username"), "test"
        );
    }
}
首先是最重要的 @SpringBootTest(classes = JwtTokenService.class),這可以宣告這個測試是在 Spring boot 的環境下進行的,因此會建立起需要的 bean 來進行測試,並且使用 @Autowired 來取得實體,接下來的測試撰寫就像一般的程式一樣。
這邊有用到比較特別的 Assertions.assertThrows 可以用來斷言 callback 中拋出的 exception。
Test API
後端程式最常用的接入點 API 當然也是要經過測試比較好的,而要從 API 角度來測試的話寫法會稍有不同,會使用到 Mockito 和 MockMvc 來完成
@SpringBootTest(classes = {UserController.class})
public class UserControllerTest {
    private MockMvc mockMvc;
    @Autowired
    private UserController userController;
    @MockBean
    private UserDaoService userDaoService;
    @MockBean
    private UserDao userDao;

    @BeforeEach
    public void setup() {
        this.mockMvc = MockMvcBuilders.standaloneSetup(this.userController)
                .setControllerAdvice(new GlobalExceptionHandler())
                .build();
        User user;
        user = new User();
        user.setId(1L);
        user.setName("Tony");
        user.setEmail("Tony@stark.org");
        Mockito.when(userDao.findById(1L)).thenReturn(Optional.of(user));
    }

    @Test
    public void testGetOneUser() throws Exception {
        ResultActions positiveCase = mockMvc.perform(get("/v1/user/1")
                                        .contentType(MediaType.APPLICATION_JSON));
        positiveCase.andExpect(status().isOk())
                .andExpect(jsonPath("name").value("Tony"));
    }

    @Test
    public void testGetUserA() throws Exception {
        ResultActions negativeCase = mockMvc.perform(get("/v1/user/A")
                                        .contentType(MediaType.APPLICATION_JSON));
        negativeCase.andExpect(status().isBadRequest())
                .andExpect(result -> Assertions.assertTrue(
                        result.getResolvedException() instanceof MethodArgumentTypeMismatchException));
    }

    @Test
    public void testGetUser2() throws Exception {
        ResultActions notFoundCase = mockMvc.perform(get("/v1/user/2")
                .contentType(MediaType.APPLICATION_JSON));
        notFoundCase.andDo(print());
        notFoundCase.andExpect(status().isNotFound())
                .andExpect(result -> Assertions.assertTrue(
                        result.getResolvedException() instanceof StatusException));
    }
}
MockMvc 有點像負責建立起與 Controller 的通道以及 Advice 等功能的套用與否,Mockito 則是用來模擬 method 的行為,由於我們在意的是 API 的行為而不希望牽涉到實際資料庫的內容,因此去模擬 DAO 以及 Service 的行為
這邊要特別注意的是,原先的 Controller 有注入 UserDao 以及 UserDaoService 那即使沒有使用到,在這裡也必須要注入或是 Mock,這樣 Controller 的注入才會成功
MockMvc 比較便利的是可以利用 andExpect 配合 MockMvcResultMatchers 的靜態方法來直接進行斷言,不需要寫太多程式碼
結語
一般的 Unit test 寫起來之後在每次 mvn 打包的時候都會執行一次,確保程式的執行結果都是正確的,所以至少要將 API 的 Unit test 寫好,而且基本的 Unit test 寫起來也非常容易理解,之後再針對細部的功能去了解各個 Unit test 該怎麼使用