
在 github page 上實現 category archive
總是看別人的部落格都有些酷酷的功能,自己的也想來一些,一開始就先從幫文章分類開始吧
其實一開始套上主題的時候覺得蠻空虛的,還以為整套功能都已經被別人實作好了(到底要多懶,總之有需多想要的功能還是得自己想辦法
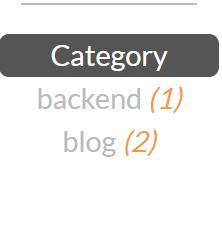
第一個想要的功能就是幫文章分類,可以藉由類別來查找文章,方便查找也方便歸類,就像現在左邊的樣子
然後點選連結就可以到一個分類的專用頁面,然後列出這個分類下的文章
那就來看看應該怎麼實作這件事
jekyll-archives
其實 jekyll 有個好用的插件可以簡單幫我們達到這件事,只要利用這個 Plugin 再加上他的設定:
plugins:
  - jekyll-archives
jekyll-archives:
  enabled: all
  layout: archive
  permalinks:
    year: '/:year/'
    month: '/:year/:month/'
    day: '/:year/:month/:day/'
    tag: '/tag/:name/'
    category: '/category/:name/'
以及相關的 layout 撰寫好
---
---
<h1>
    Archive of posts with
    {{ page.type }} '{{ page.title }}'
</h1>
<ul class="posts">
    {% for post in page.posts %}
    <li>
        <span class="post-date">
            {{ post.date | date: "%b %-d, %Y" }}
        </span>
        <a class="post-link"
            href="{{ post.url | relative_url }}">
            {{ post.title }}
        </a>
    </li>
    {% endfor %}
</ul>
然後記得加入 Plugin 後要鍵入 $ bundle 可以自動幫忙下載跟引用,以上都完成後,功能就完成了
對,就這麼簡單,而且還包好 tag 還有時間分類,你只要加上連結就好,只不過….github page 不支援 😢
前篇文章有說過 github page 不支援所有的 jekyll plugin,我只是沒想到這感覺很基本的功能居然也不支援,好吧,是我功課做的不足,不過如果你不是在 github page 上架設的話,這個 Plugin 真的是很好用
Github Action
既然 Plugin 辦不到,那還有什麼辦法做到 category archive 的功能呢?
找著找著,我找到了這篇文章 Automated Jekyll Archives for GitHub Pages
他是利用 Github 上的 Action 功能來達到的,過去從沒用過 Action 功能的我也被吸引了,感覺像是什麼黑魔法一樣,實際上我們來試試看
首先創建一個資料夾 _archives 並在裡面創建一個檔案 archivedata.txt 裡面寫入以下內容
{
    "categories": [
        {% for category in site.categories %}
        "{{ category[0]}}"{% unless forloop.last %},{% endunless %}
        {% endfor %}
    ],
    "tags": [
        {% for tag in site.tags %}
        "{{ tag[0] }}"{% unless forloop.last %},{% endunless %}
        {% endfor %}
    ],
    "years": [
        {% for post in site.posts %}
        "{{ post.date | date: "%Y" }}"{% unless forloop.last %},{% endunless %}
        {% endfor %}
    ]
}
然後建立三個 layout 在 _layout 的資料夾裡,分別是
archive-categories.htmlarchive-tags.htmlarchive-years.html
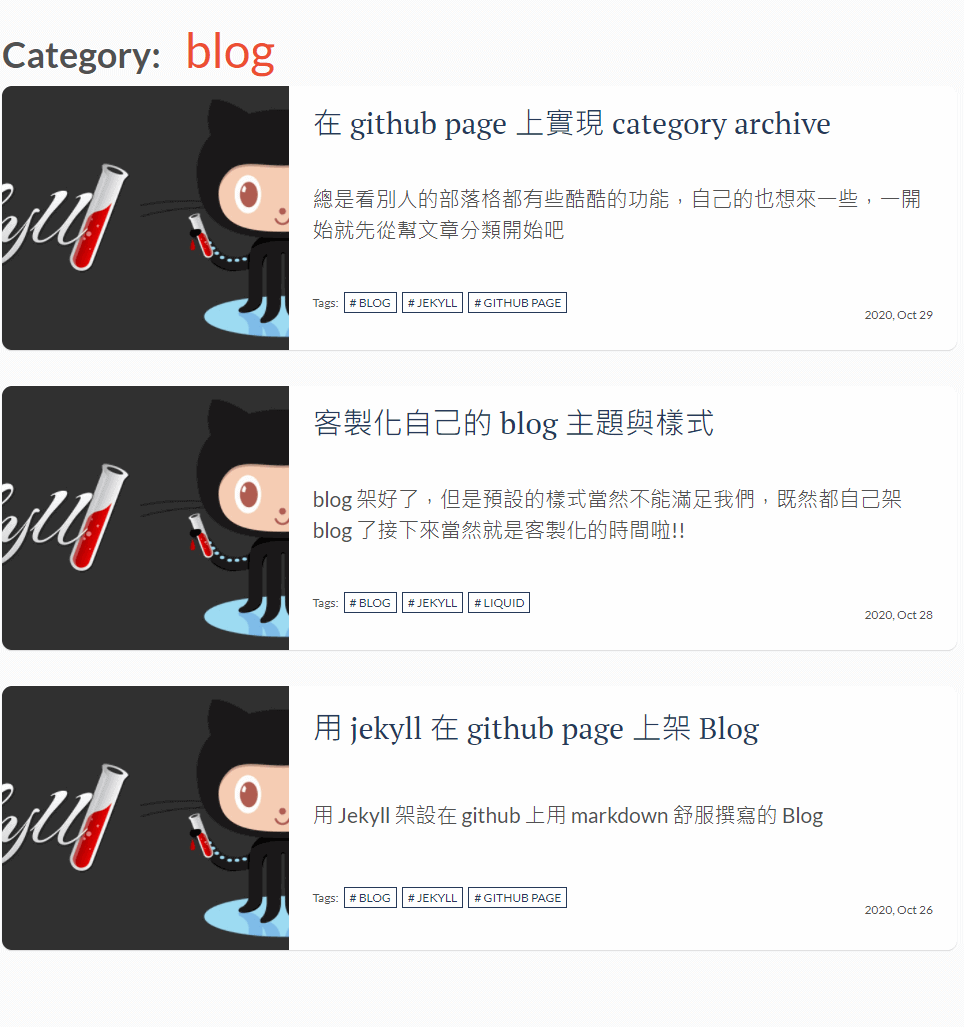
這邊提供我自己的 category layout
<div class="category-title">
    <strong>Category:</strong><span>{{ page.title }}</span>
</div>
{% for post in site.categories[page.category] %}
<article class="post">
    {% if post.img %}
    <a class="post-thumbnail"
        style="background-image: url({{"/assets/img/" | prepend: site.baseurl | append : post.img}})"
        href="{{post.url | prepend: site.baseurl}}"></a>
    {% else %}
    {% endif %}
    <div class="post-content">
        <h2 class="post-title"><a href="{{post.url | prepend: site.baseurl}}">{{post.title}}</a></h2>
        <p class="post-desc">{{ post.description | strip_html | truncatewords: 15 }}</p>
        <div class="post-info">
            <div class="post-tags">
                Tags:
                {% for tag in post.tags %}
                <span class="post-tag">
                    <a href="{{site.baseurl}}/tags#{{tag}}"># {{tag}}</a>
                </span>
                {% endfor %}
            </div>
            <p class="post-date">{{post.date | date: '%Y, %b %d'}}</p>
        </div>
    </div>
</article>
{% endfor %}
然後在專案目錄下創建一個資料夾 .github 裡面再創一個目錄 workflows 裡面塞一個檔案 add_archives.yml 內容如下
name: Generate Jekyll Archives
# description: Generate categories, tags and years archive files.
on:
  workflow_dispatch:
  push:
    paths:
      - "_posts/**"

jobs:
  build:
    runs-on: ubuntu-latest
    steps:
      - uses: actions/checkout@v2

      - name: Generate Jekyll Archives
        uses: kannansuresh/jekyll-blog-archive-workflow@master
        with:
          archive_url: "<your-site-case-url>/archives/archivedata"
          archive_folder_path: "_archives"

      - name: setup git config
        run: |
          git config --global user.name "GitHub Actions Bot"
          git config --global user.email "<>"
          git pull
      - name: commit
        run: |
          git add --all
          git commit -m "Created and updated archive files." || echo "No changes to commit."
          git push origin master || echo "No changes to push."
記得在 archive_url 欄位填入自己的 url,然後推上 github 後到 Action 的頁籤找到剛剛編輯的 action 執行
執行過程可以看一下輸出的訊息,大致可以了解到他是怎麼運作的
- 首先 Github 接收到你的專案後幫你 build 成靜態網站,然後剛剛的
archivedata.txt經過 liquid 的嵌入過後,裡面會變成一個 json 列出了所有文章的年份、tag、category - 然後 action 會去執行 jekyll-blog-archive-workflow 這個專案的 python,大概是透過 http request 去抓取到
archives/archivedata裡面放的所有分類內容 - python 再幫你創建需要的資料夾以及 html 檔,依照年分、tag、category name 去命名,然後推一包上去
- Github 再重建一次新的網站時,就多了這幾個頁面,就達到自動封裝年分、tag、category 的效果了
恩… 怎麼說呢,雖然是達到成效了,但總覺得步驟有點麻煩,每次推上去還要去按一下 action,而且因為 Github 建置網站也需要點時間,所以也不能推上去馬上按,還要等他一下,然後本地每次推之前也都要重拉一次,而且這樣本地開發就不能隨時用這個功能了,必須要 Github action 建完拉下來才是封裝好的版本,說實話有點不盡理想
自己動手做
所以最後分析完 Action 的做法之後,我決定自己手動建置這個結構,因為事實上也並不是太困難的步驟,可以留下上面的 category layout,然後在目錄下新增
└ _category
    ├ blog.md
    └ backend.md
裡面內容也很簡單,就只有
---
title: blog
category: "blog"
layout: category
permalink: "category/blog"
---
這樣建置的時候,這個頁面就會套用 layout 上去,再根據每個頁面的 category 去帶入 liquid 撈出各類別的文章列出來,這樣也可以確保本地開發就有內容,推上去也不用再按 Action,每發一篇文章最多也就多一個分類,其實並也不算太複雜的工
建立連結
那分類的頁面完成了接下來做連結,其實就只是利用 liquid 的語法去生成而已
<div class="blog-category">
  <p>Category</p>
  {% assign sortedCategories =  site.categories | sort%}
  {% for pageContent in sortedCategories %}
  {% assign category = pageContent | first %}
  {% assign size = pageContent | last | size %}
  <div class="category-div">
    <a href="{{site.baseurl}}/category/{{category}}">{{category}}
      <i>({{size}})</i>
    </a>
  </div>
  {% endfor %}
</div>
可以放在自己想要顯示的位置,這段可以列出所有的 category 並且嵌入連結,利用 sort 可以確保出現的順序
到這邊 category 的功能就實現啦,繞了一大圈,結果用了個最簡單的作法😂,不過也因此對於 liquid 的用法有更多想法了,沒想到可以利用來建立 json 再去撈來使用,有打開腦洞的感覺,好像也可以拿來建假資料,弄個 Mock Api 之類的