
OpenFlow 初學之路(三) Flow Table 基本設定與操作
本篇簡單介紹基本的 Flow Table 設定,並且實際測試封包傳送
沒看過前幾篇的可以點這邊:
拓樸環境建立
sudo mn --topo single,2 --mac --switch ovsk --controller remote,ip=192.168.xx.xxx,port=6633 -x --ar
簡單建立一個如下的拓樸
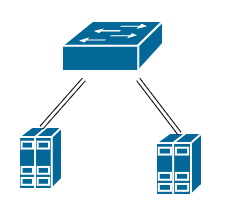
預設環境下可以先 ping 看看,正常應該是沒有回應的
mininet> h1 ping h2
ODL Controller
確認 Switch 連線資訊
接著開啟 Opendaylight 確認一下 mininet 有沒有連上 controller,可以透過以下 API 查看當前的拓樸資訊
/*
GET http://localhost:8181/restconf/operational/network-topology:network-topology
Basic Auth: admin/admin
*/
{
    "network-topology": {
        "topology": [
            {
                "topology-id": "flow:1",
                "node": [
                    {
                        "node-id": "openflow:1",
                        "opendaylight-topology-inventory:inventory-node-ref": "/opendaylight-inventory:nodes/opendaylight-inventory:node[opendaylight-inventory:id='openflow:1']",
                        "termination-point": [
                            {
                                "tp-id": "openflow:1:LOCAL",
                                "opendaylight-topology-inventory:inventory-node-connector-ref": "/opendaylight-inventory:nodes/opendaylight-inventory:node[opendaylight-inventory:id='openflow:1']/opendaylight-inventory:node-connector[opendaylight-inventory:id='openflow:1:LOCAL']"
                            },
                            {
                                "tp-id": "openflow:1:2",
                                "opendaylight-topology-inventory:inventory-node-connector-ref": "/opendaylight-inventory:nodes/opendaylight-inventory:node[opendaylight-inventory:id='openflow:1']/opendaylight-inventory:node-connector[opendaylight-inventory:id='openflow:1:2']"
                            },
                            {
                                "tp-id": "openflow:1:1",
                                "opendaylight-topology-inventory:inventory-node-connector-ref": "/opendaylight-inventory:nodes/opendaylight-inventory:node[opendaylight-inventory:id='openflow:1']/opendaylight-inventory:node-connector[opendaylight-inventory:id='openflow:1:1']"
                            }
                        ]
                    }
                ]
            }
        ]
    }
}
可以看到現在有一個 switch 在執行,並且有三個 port,分別是 LOCAL、2、1,switch 的 ID 接在 openflow 後面的是 switch 的 dpId 是 switch 的唯一識別碼
如果要查看 switch 的詳細資訊則可以透過下面 API:
/*
GET http://localhost:8181/restconf/operational/opendaylight-inventory:nodes/node/openflow:1/
Basic Auth: admin/admin
*/
{
    "node": [
        {
            "id": "openflow:1",
            "opendaylight-group-statistics:group-features": {
                "group-types-supported": [
                    "opendaylight-group-types:group-indirect",
                    "opendaylight-group-types:group-select",
                    "opendaylight-group-types:group-ff",
                    "opendaylight-group-types:group-all"
                ],

        }
        ...
    ]
    ...
}
內容太多就不詳細列出來了,總之大概會有 switch 的各種資訊以及對 openflow 的支援程度,也可以看到各個 port 的狀態,還有各種統計數值
加入 Flow Table
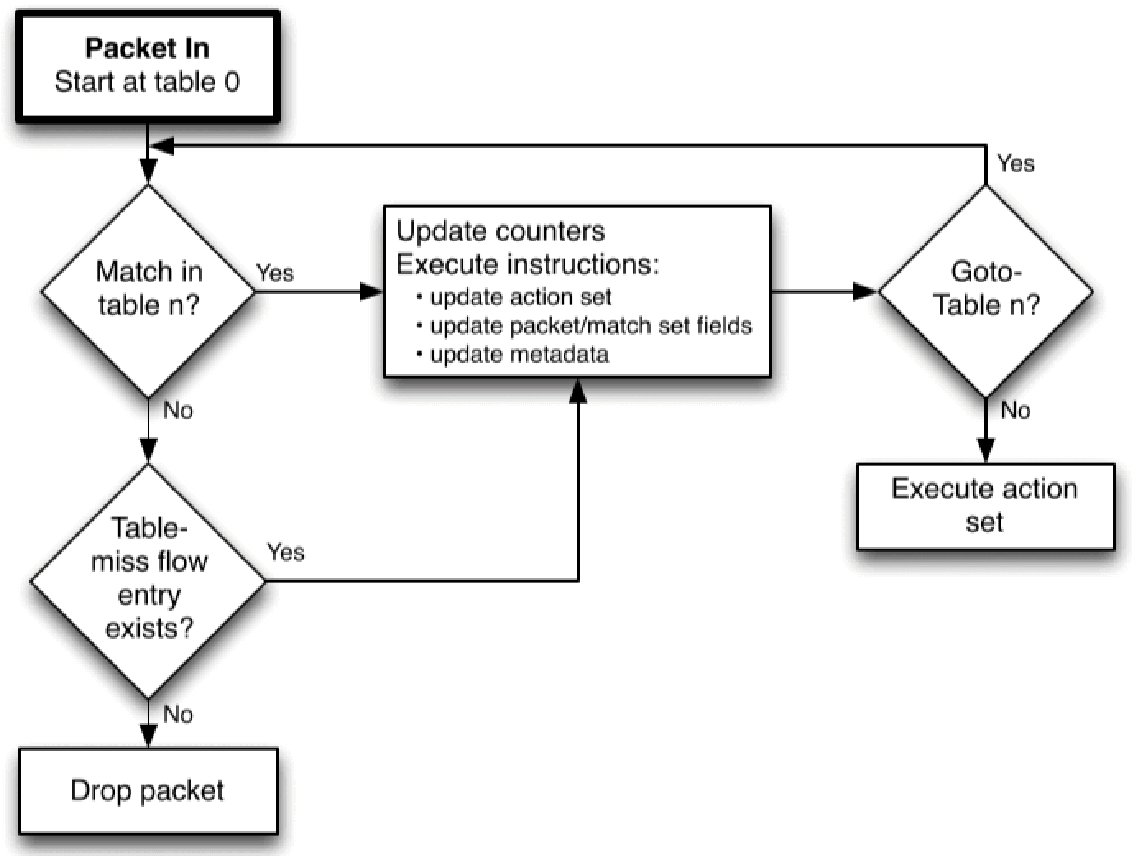
從上次的架構圖中可以看到,封包進入 openflow switch 之後會通過 flow table 然後決定送往的方向,而 flow table 裡面每個運行單位稱為 flow entry
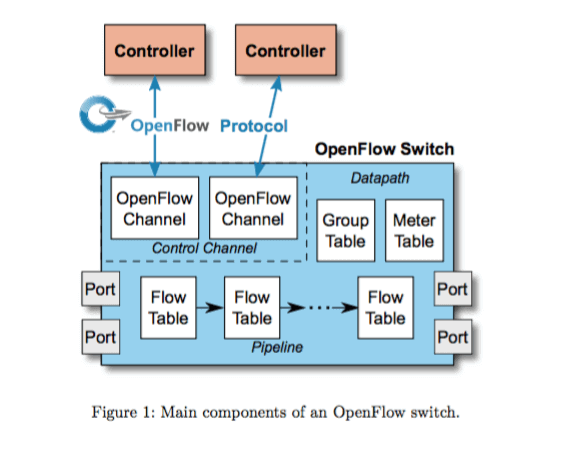
封包會依序進入每個 flow table,然後找到符合條件的 flow entry 時就會執行裡面的行為,最後封包會根據 flow entry 的設定,送往目的地或者送往下一個 flow table
那這裡我們要利用 Opendaylight 的 API 來加入 flow entry:
- h1 to h2
/*
PUT http://localhost:8181/restconf/config/opendaylight-inventory:nodes/node/openflow:1/flow-node-inventory:table/0/flow/1
Basic Auth: admin/admin
*/

// Request Body:
{
    "flow-node-inventory:flow": [
        {
            "id": "1",
            "table_id": 0,
            "priority": 2,
            "hard-timeout": 1200,
            "installHw": false,
            "flow-name": "h1 to h2",
            "strict": false,
            "match": {
                "in-port": 1,
                "ethernet-match": {
                    "ethernet-destination": {
                        "address": "00:00:00:00:00:02"
                    }
                }
            },
            "instructions": {
                "instruction": [
                    {
                        "order": 0,
                        "apply-actions": {
                            "action": [
                                {
                                    "order": 0,
                                    "output-action": {
                                        "output-node-connector": 2,
                                        "max-length": 60
                                    }
                                }
                            ]
                        }
                    }
                ]
            },
            "idle-timeout": 3400
        }
    ]
}
請求內容的參數應該都還算好理解,就不做詳細解釋了,設定好 h1 -> h2 的 flow entry 後,理論上就可以將封包送往 h2 了
可以透過 mininet 的指令確認 flow entry 有沒有被真的寫入到 switch
sh ovs-ofctl -O openflow13 dump-flows s1
或是透過 Opendaylight 的 API,也可以看到實際被更改過後的 flow table:
/*
GET http://localhost:8181/restconf/operational/opendaylight-inventory:nodes/node/openflow:1/flow-node-inventory:table/0
Basic Auth: admin/admin
*/
{
    "flow-node-inventory:table": [
        {
            "id": 0,
            "opendaylight-flow-table-statistics:flow-table-statistics": {
                "packets-looked-up": 27,
                "active-flows": 1,
                "packets-matched": 27
            },
            "flow": [
                ...
            ]
        }
    ]
}
要注意 url 的路徑,是以 operational 為主,而不是 config,config 的操作是在 opendaylight 的 datastore 之上,而 operational 則可以視為是對 switch 直接操作
經過上面的設定之後會發現還是沒辦法從 h1 ping 到 h2,不過可以透過在 h2 使用 tcpdump 來擷取封包,會發現其實是有收到來自 h1 的封包的,但是 h2 的回應沒辦法順利送到 h1,所以必須要再設定一個 h2 -> h1 的 flow entry,依照上面的邏輯可以再寫一個 flow entry:
- h2 to h1
/*
PUT http://localhost:8181/restconf/config/opendaylight-inventory:nodes/node/openflow:1/flow-node-inventory:table/0/flow/2
Basic Auth: admin/admin
*/

// Request Body:
{
    "flow-node-inventory:flow": [
        {
            "id": "2",
            "table_id": 0,
            "priority": 3,
            "hard-timeout": 1200,
            "installHw": false,
            "flow-name": "h2 to h1",
            "strict": false,
            "match": {
                "in-port": 2,
                "ethernet-match": {
                    "ethernet-destination": {
                        "address": "00:00:00:00:00:01"
                    }
                }
            },
            "instructions": {
                "instruction": [
                    {
                        "order": 0,
                        "apply-actions": {
                            "action": [
                                {
                                    "order": 0,
                                    "output-action": {
                                        "output-node-connector": 1,
                                        "max-length": 60
                                    }
                                }
                            ]
                        }
                    }
                ]
            },
            "idle-timeout": 3400
        }
    ]
}
自此 h1 ping h2 已經暢通無阻了
結語
以一個流水帳的方式說明整個 flow entry 的建立邏輯,由於穿插 opendaylight 的 API 而 API 內容及回覆都很複雜,希望不會造成閱讀困難,下一篇預計講解下 openflow 的 meter 機制