
OpenFlow 初學之路(五) Group Table 基本設定與操作
本篇簡單介紹基本的 Group Table 機制以及操作,並進行實做測試,預計是 Openflow 初學的最後一篇了
沒看過前幾篇的可以點這邊:
- OpenFlow 初學之路(一) SDN、OpenFlow 簡介
- OpenFlow 初學之路(二) 實作環境架設 OpenDaylight、Mininet
- OpenFlow 初學之路(三) Flow Table 基本設定與操作
- OpenFlow 初學之路(四) Meter Table 基本設定與操作
拓樸環境建立
sudo mn --topo single,4 --mac --switch ovsk --controller remote,ip=192.168.xx.xxx,port=6633 -x --ar
首先一樣來建立一個實驗用的拓樸,要注意的是這次拓樸我們給了 4 個 host,為了待會 group 的功能測試
預設 mininet 就能夠支援 group 了,這次就不需要額外設定了
Group
Group 的機制稍微有點複雜,這邊簡單介紹下,並附上 Group Table 的結構如下圖
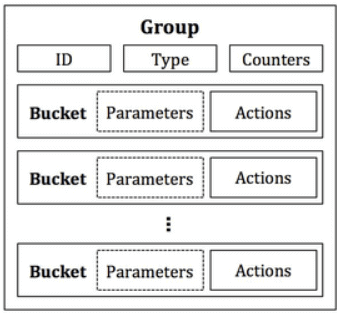
- 一個 Group 含有多個 Action Bucket
- 一個 Action Bucket 含有多個 Action,概念上就是 Action 的集合
- 根據 Group 的 Type 來決定 Action 執行的方式
Group Type
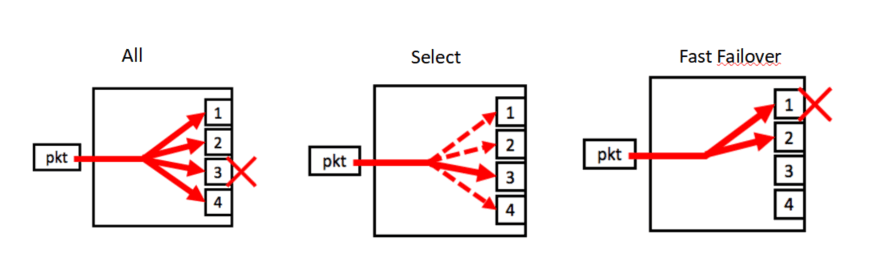
Group Type 是 Group 的一個重要設定,決定了 Group 的行為模式,總共有以下幾種
- All: 複製封包送往執行全部的 Action Buckets
- Select: 隨機選擇一個 Action Buckets,Load Balancing
- Indirect: 只能有一個 Action Bucket,用途類似包裝 Action 在各個 Flow Table 重用
- Fast Failover: 自動偵測進行故障轉移
假定一個情境,Group 的 Action Bucket 設定為 output 到 1~4 port,那各個 Group Type 的行為模式就如下圖
Group Table 建立
Type ALL
首先來測試一下 Group Table 的建立,先建立一個 Group,並設定 Group Type 為 All
/*
PUT http://localhost:8181/restconf/config/opendaylight-inventory:nodes/node/openflow:1/group/1
Basic Auth: admin/admin
*/

{
    "flow-node-inventory:group": [
        {
            "group-id": 1,
            "barrier": false,
            "group-name": "All Group",
            "group-type": "group-all",
            "buckets": {
                "bucket": [
                    {
                        "bucket-id": 1,
                        "action": [
                            {
                                "order": 1,
                                "output-action": {
                                    "output-node-connector": "1"
                                }
                            }
                        ]
                    },
                    {
                        "bucket-id": 2,
                        "action": [
                            {
                                "order": 1,
                                "output-action": {
                                    "output-node-connector": "2"
                                }
                            }
                        ]
                    },
                    {
                        "bucket-id": 3,
                        "action": [
                            {
                                "order": 1,
                                "output-action": {
                                    "output-node-connector": "3"
                                }
                            }
                        ]
                    },
                    {
                        "bucket-id": 4,
                        "action": [
                            {
                                "order": 1,
                                "output-action": {
                                    "output-node-connector": "4"
                                }
                            }
                        ]
                    }
                ]
            }
        }
    ]
}
建好 Group Table 之後也別忘了加上 Flow Table 才能套用
/*
PUT http://localhost:8181/restconf/config/opendaylight-inventory:nodes/openflow:1/table/0/flow/1
Basic Auth: admin/admin
*/

{
     "flow-node-inventory:flow": [
         {
             "id": "1",
             "table_id": 0,
             "priority": 2,
             "hard-timeout": 1200,
             "installHw": false,
             "cookie_mask": 255,
             "cookie": 106,
             "flow-name": "group demo",
             "strict": false,
             "instructions": {
                 "instruction": [
                     {
                         "order": 0,
                         "apply-actions": {
                             "action": [
                                 {
                                     "order": 0,
                                     "group-action": {
                                         "group-id": 1
                                     }
                                 }
                             ]
                         }
                     }
                 ]
             },
             "idle-timeout": 3400
         }
     ]
 }
這邊就不寫上 match 了,讓所有封包都能夠套用,讓我們簡單用 ping 來做測試,並且在每個 xterm 中都使用 tcpdump 來監控收到的封包
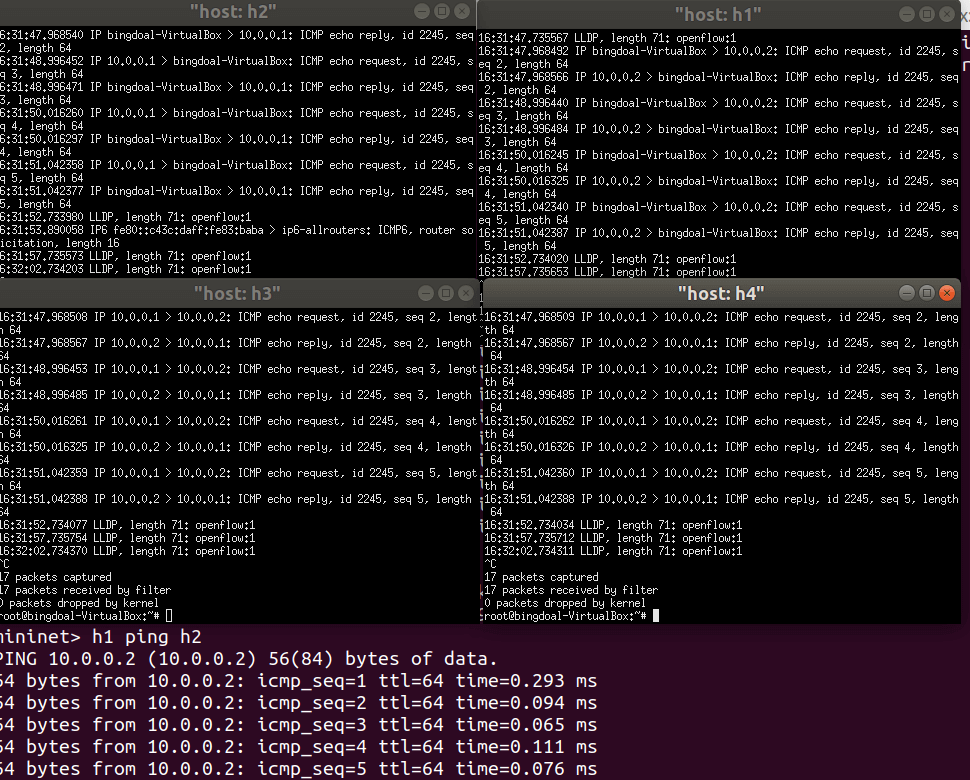
圖中可以看到雖然是從 h1 ping h2 但是所有的 host 都有收到 ICMP 的封包,可以知道 Group 的 All 的確會將封包傳送到所有的 Action Bucket,可以利用在封包廣播上
Type SELECT
接下來測試看看 Type 為 select 的時候會發生什麼情況,select 的 Group 設定要稍微更改一下
/*
PUT http://localhost:8181/restconf/config/opendaylight-inventory:nodes/node/openflow:1/group/1
Basic Auth: admin/admin
*/

{
    "flow-node-inventory:group": [
        {
            "group-id": 1,
            "barrier": false,
            "group-name": "Select Group",
            "group-type": "group-select",
            "buckets": {
                "bucket": [
                    {
                        "bucket-id": 1,
                        "weight": 1,
                        "action": [
                            {
                                "order": 1,
                                "output-action": {
                                    "output-node-connector": "1"
                                }
                            }
                        ]
                    },
                    {
                        "bucket-id": 2,
                        "weight": 1,
                        "action": [
                            {
                                "order": 1,
                                "output-action": {
                                    "output-node-connector": "2"
                                }
                            }
                        ]
                    },
                    {
                        "bucket-id": 3,
                        "weight": 1,
                        "action": [
                            {
                                "order": 1,
                                "output-action": {
                                    "output-node-connector": "3"
                                }
                            }
                        ]
                    },
                    {
                        "bucket-id": 4,
                        "weight": 1,
                        "action": [
                            {
                                "order": 1,
                                "output-action": {
                                    "output-node-connector": "4"
                                }
                            }
                        ]
                    }
                ]
            }
        }
    ]
}
除了 type 要修改成 group-select 之外,也必須為每個 Action Bucket 加上 weight,Switch 會根據 weight 的大小來決定將封包傳送到哪個 Action Bucket,而這邊全部都設置為 1,會根據 Switch 自身的演算法隨機傳送,如下圖
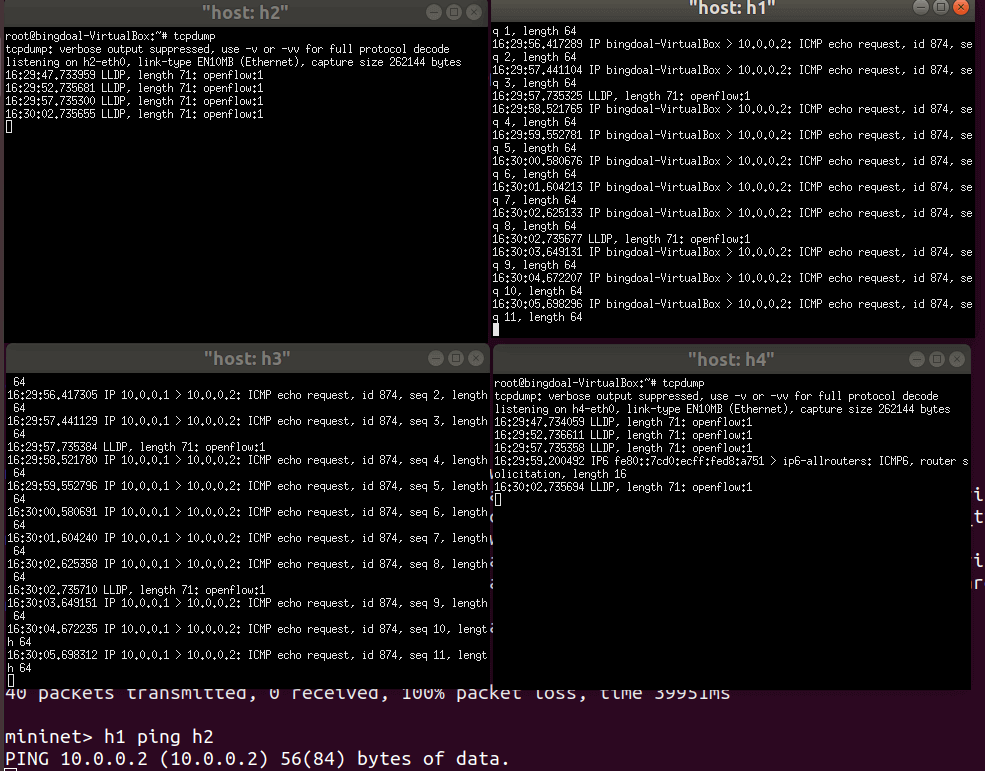
可以看到雖然是 h1 ping h2 但是卻是 h3 收到封包,而且每次由 h1 -> h2 都是 h3 收到,這功能也許可以用在 Load Balance 方面
其他
Indirect 以及 Fast Failover 這邊就不實做了,使用情境上沒有用到,Fast Failover 的實作也有點難操作,暫時先就做到這邊而已,非常懶惰XD
結語
至此 Openflow 的初階學習就到這裡,其實就是基本的應用而已,不過因為自己在接觸的時候幾乎是找不到 ODL 相關教學的,絕大多數文章都是用 Python 的 Ryu,也可以理解 Ryu 使用上比較簡便快速,ODL 實在不是個太親民的東西,也因此這幾篇文章的目的,是希望像我一樣使用 ODL 的使用者們可以比較快速了解如何在 ODL 中操作 Openflow 的東西,之後有機會再補上一些 Openflow 或是 ODL 的相關內容吧